Showing posts with label Family night. Show all posts

Monday, January 2, 2012

Monterrey Jack and Green Chili Tamales

I grew up making tamales with my mom and aunts every year.  We usually made a MASSIVE batch of beef, chili and cheese, and cheese with black olives.  It was always a family time filled with love and tradition.  My dad's side of the family are Mexican, and my mom's side of the family are Irish, French, and German.  It's funny because although my dad's family makes tamales annually, my caucasian mom and aunt make them as well, and I grew up making tamales with them every Fall.  I have amazing memories that were made with both sides of my family centered around a simple tamale.  To me tamales are a simple culinary delight!  They are so easy and cheap to make, but they can often overwhelm those that haven't ever made them.  There are a lot of steps in the process, but once you've made your first batch it will feel like you've been making them your whole life.  I will warn you ahead of time, if you decide to make them be sure to set aside at least your whole morning or evening if you plan on making a medium size batch.  If you make a large batch, you'll need to set aside the majority of your day.  A medium batch generally produces a couple dozen tamales, and a large batch produces several dozen.  This may seem overwhelming as well, but once you're finished with your tamales, you can pack them up into Ziploc baggies, label them, and toss them into the freezer for an easy dinner or lunch.  You can even fry a tamale with an egg and make an AMAZING breakfast!

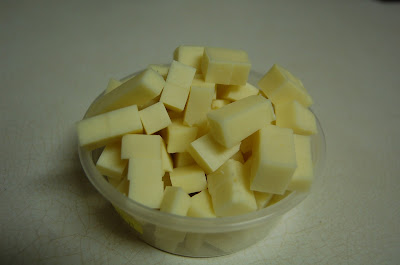
I made the chili and cheese tamales because they're kid friendly, and my family loves them.  Start by taking a 2lb. block of Monterrey Jack cheese and cut it into small pieces.  
Open your can of chili's and pour them into a wide mouthed bowl, or whatever is convenient for you.
Next you're going to grab your corn husks (the bag on the left), and your masa (the bag on the right).  Open your bag of corn husks, pull them out and begin to pull them apart.
Place the corn husks into a sink filled with warm water.  Let the husks soak for 30 minutes.  After soaking, place the husks on a towel and allow them to air dry.  
Next mix your masa in a large bowl.  Make sure to mix the masa according to the directions listed on the bag.  
My masa directions called for water, so I poured in the water and mixed until smooth.
I added a lil' veggie oil because I always saw my mom do it.  I think it makes the masa just a lil' smoother, and yummier once it's cooked.
Once you're corn husks are dry, and your masa is thoroughly mixed and smooth, you're ready to begin putting your tamales together.
Start by taking your corn husk and feeling each side.  There will be a smooth side and a rough side.  Lay the smooth side down, and place a large spoon full of masa on the rough side.  Smooth the masa down toward the bottom of the corn husk, while also making sure not to spread the masa too high up.
When spreading your masa, try to make sure that it's not too thin, and not too thick.
Once your masa is spread smoothly, place a few pieces of cheese and a small amount of chili's in the middle of the corn husk.  
Next take the left side of the corn husk and roll it toward the right side like a burrito.
Once you've rolled your corn husk like a burrito, take the top point and fold it down tucking it under nicely.
The front of your tamale should look like this.
 This is what the back of your tamale should look like by this step.
 Now that you've prepared your first batch of tamales, your ready to steam them.  Fill a stock pot of water and place a steamer basket inside.  Unfortunately I cannot find my stock pot since moving from California to North Carolina, so I was forced to use a small pot and had to steam mine lying down.
 When you place your tamales in your stock pot to steam, stand them up until the are packed around each other, and place the lid over them.  Steam your tamales for approximately 30 minutes. 
 Once your tamales are done steaming, remove them using tongs and place them on a cooling rack until they're cool enough to handle.  Once they've cooled, place them in labeled Ziploc bags and toss them in the freezer or refrigerator.  I love to make a massive amount of tamales and freeze them.  They're so easy to just pull out of the freezer, toss them into the microwave for 1-2 minutes, peel the husk off, and you're ready to eat.
 If you freeze and reheat your tamales, make sure to remove your husk after you've reheated.
Whether you eat your tamales right out of the stock pot, or you reheat them out of the freezer, tamales are a true delight!!!


Recipe:

1 4.4 lb. bag of Masa
1 bag of corn husks
2 lb. block of Monterrey Jack cheese
2-3 cans diced green chili's

You should be able to find all of these ingredients at your local Walmart.  Depending on the time of year, it can be a little more difficult to find the corn husks.  If you don't find them at Walmart, simply Google "Mexican Food Store" followed by the name of your town, and you should have no problem finding them there.  Most mexican food stores carry corn husks and masa year around.  


Friday, September 16, 2011

Amish Carmel Corn

Friday night in my house is movie night.  Following dinner, we serve popcorn and candy on a blanket in the living room, picnic style.  Lately I've been thinking about how I can get away from the candy intake during movie night.  Emma usually asks for marshmallows and gummy candy, but because I'm not a fan of the ingredients that those candies are made of, I've been thinking of alternative options.  The thought of carmel popcorn came to mind this morning as I was boiling the chicken for Italian Chicken Soup.  I began to gather my ingredients, and realized that I didn't have any corn syrup (which I'm not a fan of either).  Instead, I decided to make a simple syrup to replace the corn syrup.  This carmel popcorn is absolutely delicious, and the whole family will LOVE it!!!  Are you ready to make some Amish Carmel Corn?  Let's do this!!

Begin by gathering your ingredients for your simple syrup if you decide to replace the corn syrup with it.  Pour 1 c. of sugar, and 1 c. of water into a small pot.  Boil until the sugar is dissolved.  Take syrup off of the heat and set aside.  

Up next, turn your oven on at 325 degrees F.  Now you're going to pop 3 bags of microwave popcorn.  I used buttered popcorn, but you can use whatever kind you'd like.  It all works great!

Once the popcorn is done, pour an even amount onto 2 greased baking sheets.  

In a medium pot, combine 1 c. butter or margarine, 2 c. brown sugar, 1/2 c. simple syrup or corn syrup, and 1 tsp. salt.   


Over medium heat, bring your mixture to a boil, stirring constantly for 5 minutes (during boiling period).
After the 5 minutes is up, remove from heat immediately.  Add 1tsp. vanilla, 1/2 tsp. baking soda and stir.

Immediately pour your syrup evenly over the 2 baking sheets of popcorn.  Toss popcorn with a spatula to evenly coat.  Place your baking sheets into the oven for 1 hour.  Every 15 to 20 min., give your baking sheets a light shake to make sure the popcorn is evenly cooking.

While the corn is baking, take this opportunity to set wax paper out on your counter.  Once the corn is done, pour it out onto the wax paper, and allow to cool completely.  Store in an airtight container, or in Ziploc baggies.

A great idea if you're serving this to the wee ones: Buy a couple of the pop corn boxes like they serve at the circus or the theatre, and dish it up.  My girls love this, and it makes a great memory!  Enjoy!!!


Here's the recipe:


Ingredients

  • 7 quarts plain or buttered popped popcorn
  • 2 cups dry roasted peanuts (optional, I didn't use them)
  • 2 cups brown sugar
  • 1/2 cup light corn syrup or simple syrup
  • 1 teaspoon salt
  • 1 cup margarine
  • 1/2 teaspoon baking soda
  • 1 teaspoon vanilla extract


Ingredients for Simple Syrup

  • 1 cup white sugar
  • 1 cup water